


 |
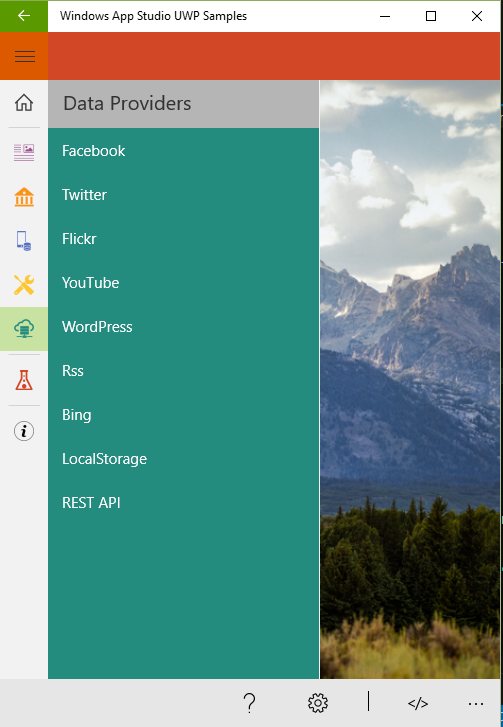
| Figure 1: Main Page of App Sample |
Ứng dụng UWP này, là ví dụ về các Custom Control, Classes dành cho mọi người tham khảo. Bạn có thể xem chi tiết mã nguồn từ Github và các Control, Classes cũng có sẵn trên Nuget Package nếu bạn cần.
(Yêu cầu: Cần Windows 10/ Mobile để tải app)
GET: Windows 10 App Stores
GET: Github Repository
GET: Nuget Package:
Dựa vào các ví dụ trong app trên, nó sẽ mang lại nhiều kinh nghiệm và hứng thú cho bạn trong lập trình các ứng dụng UWP nếu bạn quan tâm.
Ngoài ra, tôi sẽ hướng dẫn bạn sử dụng mã nguồn trên để có được khung giao diện menu Hamburger cơ bản như hình.
 |
| Figure 2: Main Page of Sample |
Mục tiêu của ứng dụng mẫu trên là demo các custom controls, classes. Nhưng bạn có thể tự mình apply chúng vào code của mình sau. Còn mục tiêu của hướng dẫn tiếp theo dưới đây chỉ muốn sử dụng menu hamburger trong 1 rừng code của source code trên. Đó là cái khung giao diện của app sample này, từ đó bạn muốn code lại các tính năng của nó thì sẽ dễ dàng hơn. Sẽ lấy y nguyên mã nguồn trên nhé, không thêm bớt đoạn code nào. Okay let's go...
Bắt Đầu
(Yêu cầu: Cần Visual Studio 2015 - Include UWP, Windows 10 Pro, Download source code của app về máy )1. Create Blank UWP Project
Tạo mới một Blank App (Universal Windows). Khá dễ phải không, qua bước tiếp theo
2. Create Control, Classes, Xaml Page, Xaml Resources, AppShell page & modify App.cs/App.xaml
Như đã nói, ta chỉ copy/paste và remove một vài đoạn code không cần dùng đến.
a.) Create Controls folder
- Tạo mới folder tên là Controls
- Copy/Paste 2 control là ShellControl, CommandBarEx từ source code (../waslibs/src/AppStudio.Uwp/Controls) vào folder mới tạo.
- Nên đổi namespace của các classes và xaml mới copy
- Ctrl + Shift + F: để replace all file.
- Namespace nên bỏ qua tên ShellControl, CommandBarEx cho ngắn gọn. Ví dụ: namespace Your_Project.Controls hoặc tùy bạn (Thông thường bạn tạo file mới namespace sẽ generate bắt đầu từ project đến folder chứa file đó.)
 |
| Figure 3: Control folder in Source Code |
 |
| Figure 4: Add file include in Project |
b.) Create Common folder
- Thư mục này có chút đặc biệt, tạo folder Common sau đó bạn copy/paste 2 class SamplePage.cs và SamplePageAttribute.cs từ folder (..waslibs/samples/AppStudio.Uwp.Samples/Common)
- Đổi tên thành CommonPage.cs và CommonPageAttribute.cs
- Đổi namespace phù tương ứng với project của bạn
 |
| Figure 5: Common folder |
- Ta sẽ sử dụng để tạo các Custom Page sau nay, hãy theo dõi tiếp dưới đây
- CommonPage chủ yếu thiết lập Commandbar và Header của CustomPage
- Ta sẽ lược bỏ vô số đoạn code trong class CommonPage.cs không cần thiết để trông dễ hiểu hơn. (Tuy nhiên, bạn xem trực tiếp các thay đổi vào mã nguồn demo ở cuối bài viết này)
 |
| Figure 6: Header and Command Bar |
c.) Create Navigation, Extensions, Commands & Services folder
Tương tự, bạn tạo các thư mục Navigation, Extensions, Commands và Services, rồi copy/paste hết class từ source code vào đây:
- (../waslibs/src/AppStudio.Uwp/Navigation)
- (../waslibs/src/AppStudio.Uwp/Extensions)
- (../waslibs/src/AppStudio.Uwp/Commands)
- (../waslibs/src/AppStudio.Uwp/Services)
 |
| Figure 7: Extension Method |
- Có thể xóa InternetConnection.cs trong folder Services vì nó không cần thiết. Một vài class khác cũng không cần thiết, nhưng thôi cứ để nguyên.
d.) Create Resources
Tạo các folder và copy/paste các resources trong folder Strings, Styles, Templates:
- (..waslibs/samples/AppStudio.Uwp.Samples/Strings)
- (..waslibs/samples/AppStudio.Uwp.Samples/Styles)
- (..waslibs/samples/AppStudio.Uwp.Samples/Templates)
(Chủ yếu lưu các thông tin thuộc tính chẳng hạn như mã màu, text, icon... Bạn hoàn toàn không cần sử dụng resources, nhưng để dễ quản lý, chỉnh sửa thì đây là cách tuyệt vời)
e.) Create CustomPage and Views Folder
- Tạo 2 folder CustomPage và Views
- CustomPage: chưa các Page kế thừa CommonPage.cs mà chúng ta đã nói ở trên
- Views: chứa các page bình thường cho nó gọn gàng. Ở đây, tạm thời ta tạo AboutPage và MainPage
 |
| Figure 8: Custom Page |
<local:CommonPage
    x:Class="WindowsAppStudioDefaultShell.CustomPage.APage"
    xmlns="http://schemas.microsoft.com/winfx/2006/xaml/presentation"
    xmlns:x="http://schemas.microsoft.com/winfx/2006/xaml"
    xmlns:local="using:WindowsAppStudioDefaultShell.Common"
    xmlns:d="http://schemas.microsoft.com/expression/blend/2008"
    xmlns:controls="using:WindowsAppStudioDefaultShell.Controls"
    xmlns:mc="http://schemas.openxmlformats.org/markup-compatibility/2006"
    mc:Ignorable="d">
    <controls:ShellControl.CommandBar>
        <controls:CommandBarEx x:Name="CommandBar" PrimaryCommandItems="{Binding PrimaryCommands}" />
    </controls:ShellControl.CommandBar>
    <controls:ShellControl.PaneHeader>
        <Grid Name="PaneHeader"  Background="{Binding CommandBarBackground}" />
    </controls:ShellControl.PaneHeader>

    <Grid Background="{ThemeResource ApplicationPageBackgroundThemeBrush}">
        <TextBlock Text="This is Page A" FontFamily="Tahoma" FontSize="24" Foreground="Red"
                   HorizontalAlignment="Center" VerticalAlignment="Center"/>
    </Grid>
</local:CommonPage>
using Windows.UI.Xaml.Navigation;
using WindowsAppStudioDefaultShell.Common;

namespace WindowsAppStudioDefaultShell.CustomPage
{
    [CommonPage(Category = "CustomPage", Name = "APage", Order = 10)]
    public sealed partial class APage : CommonPage
    {
        public APage() : base(true)
        {
            InitializeComponent();
            this.DataContext = this;
            CommandBar.DataContext = this;
            PaneHeader.DataContext = this;
        }
        public override string Caption
        {
            get { return "A Page Header"; }
        }

        protected override void OnNavigatedTo(NavigationEventArgs e)
        {
            base.OnNavigatedTo(e);
        }
    }
}
f.) Create AppShell Page
Đây là trang quan trọng nhất, nó chính là khung menu hamburger. Được rồi, tiếp nhé...
Copy/paste AppShell,xaml/AppShell.xaml.cs từ (..waslibs/samples/AppStudio.Uwp.Samples) vào project của mới của bạn.
- Đổi tên namesapce cho phù hợp
- Sửa lại method điều hướng tới CustomPage và AboutPage, MainPage
 |
| Figure 9: AppShell.cs |
Okay, chú ý các điểm mũi tên màu đỏ. Ta có các method trả về các kiểu dữ liệu cần thiết dựa vào tham số là tên được định nghĩa trong Resources và Attribute của Custom Page.
g.) Modify App.xaml/App.xaml.cs
- Cũng copy/paste vào từ (..waslibs/samples/AppStudio.Uwp.Samples) vào project của bạn. Tuy nhiên, cần loại bỏ một số đoạn mà ta không cần dùng đến. Nó liên quan đến chức năng khác mà ta không nói ở đây.
Trong file App.xaml
<Application
    x:Class="WindowsAppStudioDefaultShell.App"
    xmlns="http://schemas.microsoft.com/winfx/2006/xaml/presentation"
    xmlns:x="http://schemas.microsoft.com/winfx/2006/xaml"
    xmlns:local="using:WindowsAppStudioDefaultShell"
    RequestedTheme="Light">
    <Application.Resources>
        <ResourceDictionary>
            <ResourceDictionary.MergedDictionaries>
                <ResourceDictionary Source="Styles/AppBarButtons.xaml"/>
                <ResourceDictionary Source="Styles/AppColors.xaml"/>
                <ResourceDictionary Source="Styles/AppTheme.xaml"/>
                <ResourceDictionary Source="Templates/HeaderTemplates.xaml"/>
                <ResourceDictionary Source="ms-appx:///Controls/ShellControl/ShellControl.xaml"/>
            </ResourceDictionary.MergedDictionaries>
        </ResourceDictionary>
    </Application.Resources>
</Application>
Trong file App.xaml.cs chỉ cần loại bỏ đoạn code sau
//await BitmapCache.ClearCacheAsync(TimeSpan.FromHours(24));
// await PhotosDataSource.Load();
// await FeaturedControlsDataSource.Load();
- Copy/Paste Singleton.cs vào project của bạn nữa là xong.
Done!
Kết Quả
 |
| Figure 10: Main Page |
 |
| Figure 11: About Page |
 |
| Figure 12: List Custom Page |
 |
| Figure 13: A Page |
Created: 25/09/2016
Updated: 01/10/2016
Source Code: Tải về tại đây
 [Share & Use] Windows App Studio UWP Samples
Related Tags :News Samples UWP

No comments:
Post a Comment
Commets Download Photoshop Actions, Lightroom Presets, PSD Template, Mockups, Stocks, Vectors, Fonts. Download free